Welcome to the first installment of the Rigging Roundup. In this and future issues, I’ll explain some of the basics of the rigging systems on the Highlander. Hopefully, the topics will be of interest to all of you. The methods explained may not be identical to those on your boat, but they might give you a few ideas.
The first system is the lowly topping lift. I have seen far too many boats with inefficient, if not inoperable topping lifts. The usual less-than-ideal system has a single purchase line from the pole hook up to a turning block then down to a cheek block on the base of the mast, then right into a plastic clam cleat with the teeth worn off. With this setup, the forward crew has to lean in from the rail to adjust the pole height.
A double-ended system will give either crew the ability to adjust the pole. With a few blocks and some line, a very efficient and easy-to-use topping lift can be had by all!
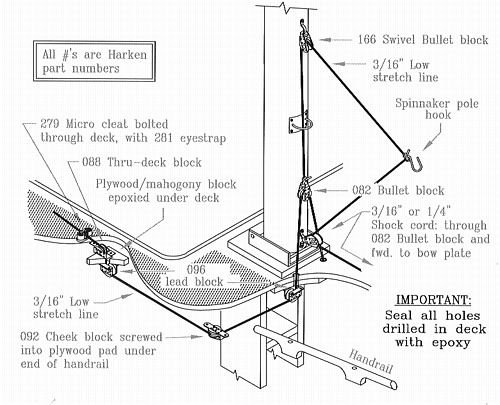
Start by picking the location for the new clam cleat on the side decks. Choose a spot between the coaming and the shroud about 12″ back from the forward coaming. Located here, the cleat will be accessible, yet out of the way of the crew’s legs when hiking. Lay out the thru-deck block next, just forward of the cleat. You don’t need to leave any space between them. A router with a 1/4″ straight bit works great to cut the hole required (a jigsaw with a very fine blade or just a hacksaw blade would work too). Seal the cutout with epoxy to protect the balsa in the deck.
The next step is to epoxy the wood pad under the deck to mount the stand-up lead block. Use a thickened epoxy mixture and let it cure before proceeding. The cheek block gets mounted to the plywood pad already in the deck that the handrail is bolted to. The two stand-ups at the mast step are located by the two holes drilled in the deck for the line. Try to locate these as close to the aluminum mast step as possible (it’s OK to put them up on the wood mast step if there’s room. Use two plastic fairleads for a smooth exit. Seal the holes with epoxy. All that is left is to mount a block at the base of the mast for the shock cord. This can be on the mast or the deck up against the mast step. Just tie the shock cord to the bow eye.
Look for more rigging tips in future issues. Thanks, and good sailing!