Here’s the story: You round the leeward mark, spinnaker half up, crew half hiking, centerboard half down, skipper half looking around wondering why everybody else is rolling over you as you try to sort out the mess in the bottom of the boat. Once everybody has their jobs done and you start to think about the upwind leg, someone notices that the outhaul isn’t on. The forward crew steps in, yanks on the line… nothing happens. It’s blowing too hard for your 3-to-1 purchase outhaul to even budge. You ease the main a few inches…nothing. Ease the main a few feet and you might get half of the outhaul necessary for the conditions. This is all occurring as you try to sail the boat fast, play the wind shifts and control your competition. If this has ever happened to you, you might want to think about turbo-charging your outhaul.
It seems as though the outhaul is one of the most forgotten systems on the boat. Ask someone about their vang and they’ll tell you they have a Gleason Torsen powered, hydraulically assisted 18 to 1 vang with a 27 to 1 fine tune. Ask about their outhaul and they don’t even know for sure how much purchase they have. Hopefully, this article can help all of us to overcome the “not enough outhaul” blues.
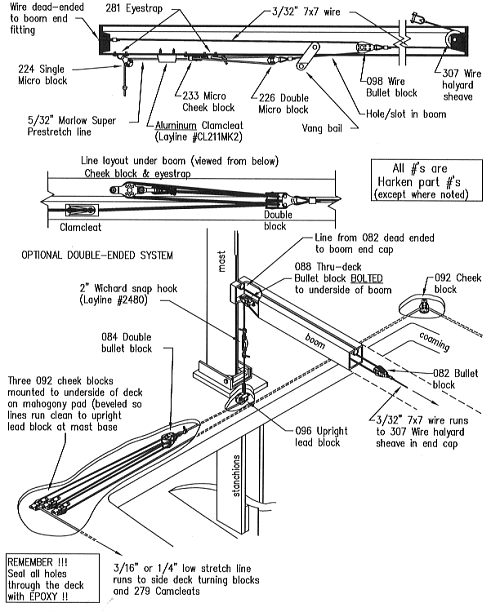
I personally like the boom-mounted outhauls for their simplicity and ease of adjustment by the forward crew. The double-ended setups can be awkward to release after rounding the windward mark because someone is always sitting on the cleat. The forward crew can tweak on the outhaul right before they douse the spinnaker and not lose a beat. Choose the setup that suits your sailing style.
The first thing to do is to get rid of those stainless steel V-jam cleats that every boat came with from the factory. These guys have no place on a modern sailboat (writer’s biased opinion). These cleats are usually accompanied by a 3 to 1 outhaul: completely inadequate for the racing Highlander. To do a good job of it you will have to open up your boom. This is easy, all it takes is A DRILL, drill bits, some stainless POP rivets and a bit of patience. Start off by gathering all of the hardware that you’ll need (see drawing) and laying everything out on the ground it their proper locations. This is the easiest way to be sure the wires and lines are all long enough. Even though the outhaul is one of the least adjusted things on the boat, it will still benefit from low friction. Thin, very low stretch lines and blocks sized to the lines used will reduce friction. Use only 3/32″ 7×7 or 7×19 flexible wire or that cool new 100% Spectra line from Layline (watch sharp edges – Spectra will break if it frays on a corner) for the final run to the end of the boom. A Harken 307 ball bearing sheave is a great replacement for the plastic or tiny metal sheaves at the end of the boom. How many times has your wire outhaul gotten “fish hooks” where it enters the boom at the clew of the sail?? It does this because the sheave is WAY too small. You will have to modify the end cap to fit the new ball bearing sheave. Mine only needed some minor filing.
Try to avoid double and triple blocks inside the boom. They will twist and bind and foul inside where you can’t get to them. Use cascading block systems if you are going to put all of your blocks inside the boom. Drill a hole in the front boom cap to dead end the rope with a stopper knot or a loop and Nico squeeze deal for wire.
For the double ended systems, use the smallest, easiest running, lowest stretch line you can stand to pull on. The worst thing you can do is use all new Harken blocks with huge 5/16″ fuzzy line that binds in the blocks. 1/4″ line is the biggest stuff you should use. 3/16″ is even better (if you wear gloves). Another concern is making sure all the lines run fair through the blocks and don’t rub on anything. The beveled pad under the 3 cheek blocks is necessary because the deck is sloping up toward the mast at the rails, and you want the line to lead to and from the blocks without rubbing the edges of the blocks. The 096 stand up lead block is mounted under the deck right behind the mast. Drill the hole for the line down through the mast step teak and deck first. Make the hole large enough to fit a plastic fairlead or bushing (Layline #R3044 or #R4054). Then mount the lead block under the deck. Seal this hole with epoxy before fitting the bushing or block. Make sure you have plenty of line running from one side all the way to the other side. You don’t want to run out of slack on one side because the line is all taken up on the other side of the boat.
When assembly time comes, be sure that there are no sharp edges inside the boom for your lines or wires to rub against. POP rivets aren’t too bad, but screws are the worst offenders!! Slide the blocks and lines into the boom (get help, this can be hairy) and test the system out BEFORE you rivet the end caps back on. Check to be sure you have plenty of travel at the end of the boom. Slide your mainsail on and check it to be sure. Only after you are sure everything is OK, rivet away and the boom is done.
If you have a wooden boom that you just won’t part with, be careful with the outhaul. I wouldn’t recommend more than 4 to 1 purchase. Keep an eye out for rot at the end of the boom.
Good luck and don’t forget to pull the outhaul on before you round the leeward mark.